
Stephen Graham Jones once said, “Some people are born for Halloween, and some are just counting the days until Christmas.” Fortunately, at Sawcutting Specialties, we know exactly what it means to live for that utterly magical Halloween spirit!
With that said, for this especially spooky season, we’ve chosen to highlight ten of the best DIY Halloween projects that utilize saw blades of all kinds. No matter what your theme or budget is this year, we guarantee that you will be able to find at least one project on here that’s right for your Halloween house! So, what are you waiting for? Let the toil and trouble begin!
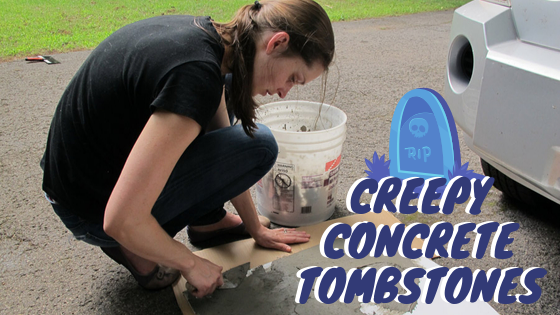
1. Create Creepy Tombstones out of Concrete Slabs
For this first spooky project, the best way to handle it is by first setting a large slab of concrete and waiting for it to harden. The reason for this is, depending on the size of the slab, you may be able to get roughly 4-6 tombstones out of it rather than needing to lay out several tombstone-shaped setting molds which is clearly a pain in the butt. This is also why this project requires a slab concrete saw blade to complete!
In order to make sure that the slab is perfect, you will likely want to use the mold dimensions 6’ long by 3’ wide with a 4” thickness. This will get you precisely 6 tombstones in total. Lastly, don’t forget to add names and other clever statements to your tombstones as they dry in order to have personalized and obvious tombstones once they’re complete!
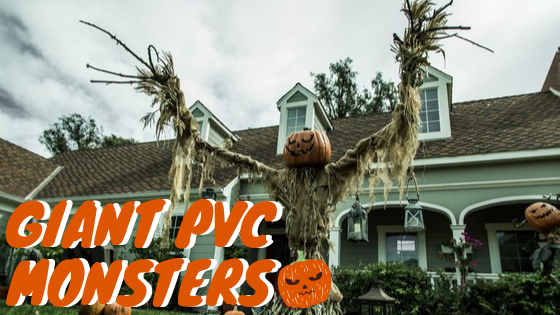
2. Build Giant PVC Monsters
Have you ever walked into a Spirit Halloween or Halloween City and dreamed of a day when the giant animatronic ghouls throughout the store could finally be yours? If so, then this is the perfect project for you.
Although these PVC monsters won’t move around like the ones in the store, you can actually take the project to the next level by adding a cheap motion-activated voice box in order to get the vibe of those highly-expensive monsters without all the money and effort.
To create this project, you will need PVC, joints, a foam ball roughly the size of a head, a cheap but scary halloween mask, some high-quality glue such as Liquid Nails, and very large clothing or fabric. Start by using a saw blade that has a high teeth count and smaller gullet in order to cut the PVC into five pieces (two arms, two legs, and a torso). Then, attach two joints to the torso that have three connecting points so the arms and legs can attach to the main body. Lastly, add the foam ball using the glue to the top of the torso and put the mask and clothing on your creation.
A great way to keep your monster upright is to attach boards or concrete blocks to the legs so it won’t blow in the wind or topple easily.
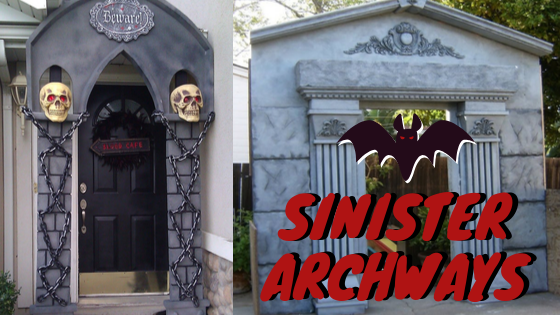
3. Construct A Sinister Archway
This next project is one that can be either as simple or as complex as you wish to make it. The main construction is created by using wood and screws while the actual details can be wooden cutouts, decorations of any sort, and paint.
To create your own sinister archway, you will want to start by measuring your walkway or doorway. Once you have that measurement, aim for an archway roughly eight feet tall so any person can comfortably walk through it.
After you have cut your wooden beams to match these dimensions, assemble the base for your archway and then determine how in-depth you plan to go from there. You may want to use your saw to cut out a mausoleum front or menacing columns. After this is cut out, simply attach these pieces using nails to the frame and begin your convincing paint job. From there, you can run with it or be done with it.
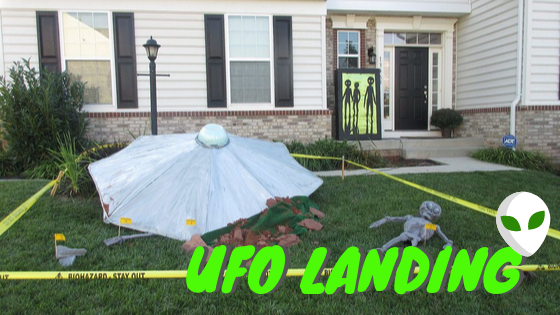
4. Set up Your Very own UFO Landing
To create your very own UFO, the main components needed will be metallic paint, a plastic bowl, glue, thin wooden planks, and a weather-proof fabric such as a tarp or a sun shield.
The first step in the process will be to use your saw to cut the thin wooden planks perfectly so as to make a series of evenly-sized foundation pieces. You will then want to attach them all at one point fanning out to make something resembling a star with a bit of an arch to them. Repeat the process once more and attach them together to create the base for your UFO.
From there, cover your foundation in your fabric of choice and paint it with your metallic paint. Lastly, paint the plastic bowl and glue it to the top of the UFO as a finishing touch. If you want to take this project to the next level, add some fallen aliens around the ship as well as a fog machine behind it to signify that it has crash landed on earth.
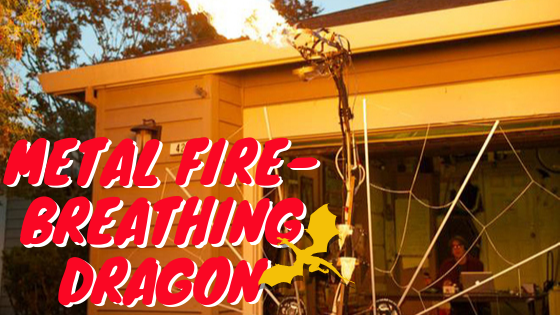
5. Make a Metal Dragon That Actually Breathes Fire
Perhaps the most difficult project on this list, this metal fire-breathing dragon is sure to blow your neighbors’ decorations away. This project requires a keen eye for welding, the ability to cut metal using a precise saw blade, and a basic understanding of how pyrotechnics work.
Because this project is rather in-depth, below is a simple step-by-step guide to the finished product. After all, even though it’s Halloween, there’s no need to scare yourself with your questionable assembly process!
DIY Metal Dragon Tutorial
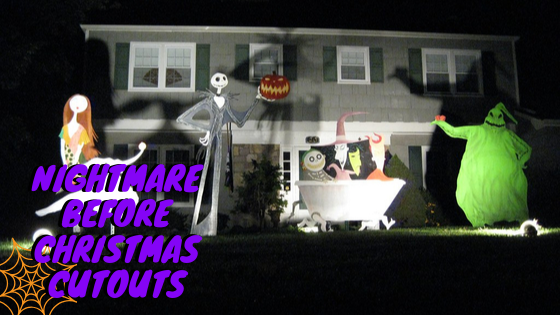
6. Nightmare Before Christmas Wooden Cutouts
Often considered the most iconic children’s Halloween movie of all time, Nightmare Before Christmas is a great way to create decorations not only for Halloween but for Christmas as well! For this project, you will need paint, plywood slabs, wooden or metal garden stakes, weather-proof clear coat finish, and nails.
Start by outlining your characters on the wooden slabs. You can always print out large prints of the characters to be sure that they are just like the movie. From there, use your saw to cut out the rough shape of these characters. Try to keep thin areas thicker as you can always paint the background black. This is primarily so you don’t have the cutouts break by accident.
Next, screw the stakes onto the bottom of your cutouts. Be sure to do this before you paint so you don’t have to go back in with more paint after the fact. Lastly, paint your characters completely and then apply a few layers of clear coat to protect them from the elements.
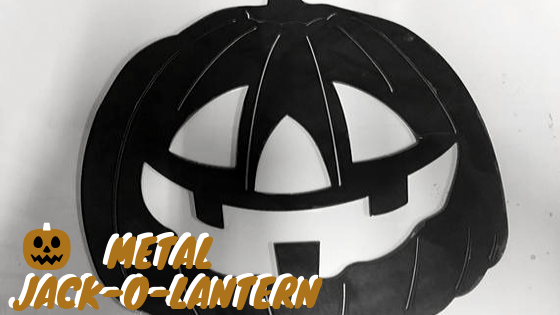
7. ‘Carve’ Your own Metal Jack-O-Lanterns
Are you the kind of person that loves Jack-O-Lanterns but despises having to carve them each and every year? Do you wish your pumpkin creations could last forever? If so, these metal Jack-O-Lanterns are perfect for you.
All it takes to create your own metal Jack-O-Lantern is a saw blade capable of making precise cuts through metal and metal sheets as well as tools to shape and profile the face of your creation. You can also buy some clear yet strong glue if you want to go around the sharp edges to prevent anyone being cut by accident.
If you can’t seem to come up with good Jack-O-Lantern designs on your own, check out this list of 25 easy pumpkin carving templates sure to spook anyone that crosses their path!
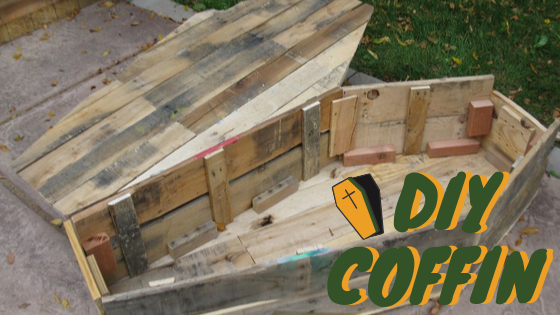
8. Make a DIY Coffin
Is there anything more spooky and sophisticated than a coffin lawn decoration for Halloween? The truth is that these decorations can cost you anywhere between $200 to $400 in a Halloween store but are as simple as cutting planks and nailing them together.
In fact, the messier the coffin looks, the older it appears making it the perfect saw blade project for beginners. To create this custom decorations, you will need to either purchase new wooden planks or look for them in your local area.
You may be able to find free planks or pallets than can be disassembled if you look hard enough in your area. For us, Boise is a wonderful place to find these kinds of materials for cheap so our local customers would likely be able to create this project practically free of charge!
Once you have your pieces, it’s all about laying them out and tracing a coffin shape. For the sides, you will only need straight planks so the main planks to focus on are the top and bottom ones of the casket. After you have all of your pieces traced out, use your saw to cut them out and then proceed to nail them all together as expertly or sloppily as you wish. From there, you can add all kinds of things ranging from blood and chains to full bodies and hands prying the coffin open.
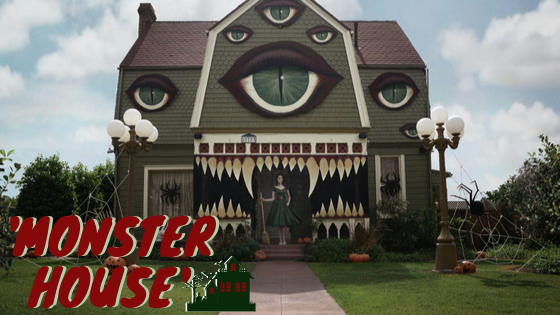
9. Turn Your House Into a ‘Monster House’
Although your lawn may be expertly decorated, does your house truly have anything to it other than a few spiderwebs and window clings? If not, the ‘Monster House’ project is the way to go.
To complete this project, you will need plywood slabs, paint, clear coat, blue tack, and a saw blade capable of making precise wood cuts. Start by tracing out various eye shapes and teeth. Then, move on to giant lips the exact size of your front doorway. After you have traced out your eyes and mouth, use your saw to cut out your various pieces.
From there, paint them however you like and use clear coat to protect them from the elements. The final step is to use the blue tack to attach the eyes and mouth to your home so it appears as though your home is truly alive.
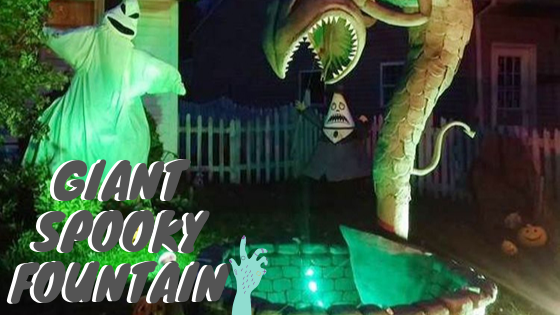
10. Turn an old Stone Fire pit Into a Giant Spooky Fountain
For the final project on this list, you will need foamcore, metal mesh, PVC, Industrial-grade glue, a fountain tubing kit, zip ties, a tarp lining, paint, and clear coat. The first step is to take your old stone fire pit and bring it to your front yard.
From there, line the bottom and sides of the pit with your tarp so there are no ways for water to escape. After this is complete, begin on the PVC frame of the monster of your choice. Whether you choose a gargoyle, demon, or even an iconic Halloween fountain design, you will want to create the structure at this point and connect it to the inside of your fountain. Then, bring your fountain tubing up its body and out its mouth ever so slightly. You can attach it to the base using the zip ties recommended above.
Once the PVC is connected and the fountain tube is in place, use metal mesh to add a bit of substance to your base. Using the foamcore, cut out pieces and shapes to create the outside of your creature and attach them using the industrial glue.
The last step is to add the water and start your fountain tubing system. For an added effect, put dry ice into the water or dye the water green or red using food dye.
Thus Concludes our Spooky Decorations List!
After you’ve added at least a few of these inventive Halloween projects to your home, all that is left is to buy the candy and enjoy the festive spirit during the spookiest holiday of the year!
If you would like to create one of these projects but aren’t sure which saw blade is right for which project on our site, don’t hesitate to call all of us at Sawcutting Specialties today! We’ll be happy to help turn your cozy home into a Halloween Spooktacular in no time!